

Introduction
In this blog, we will be making a Machine Learning model in Python that can add colors to old, washed-away, and faded images. In summary, we will be colorizing images.
What we are going to do, is feed a grayscale image into the model, and get the output from the model must be a colorization of the image that should be practical, e.g., if we feed in the grayscale image of a spaniel, we should not get a pink-skinned dog as an output. We shall be using CNN to colorize the photos.
Here is a brief illustration of how it works in deep learning:
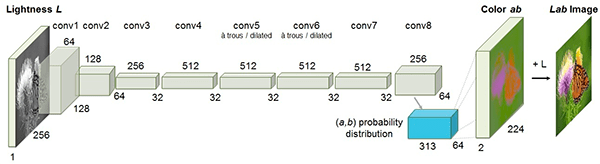
Image source : link
Instead of using the traditional RGB color space, we will use the “Lab Space of colors.” Since we will be only dealing with grayscale images as input, we can only stick to using the L space. From that particular space, we can further use it to predict results for a and b. Thus, the final ab image can be combined to get the required output. Finally, we shall be converting the Lab image to RGB.
Coloring Faded Images:
Dataset:
Load the dataset into the editor directory of your choice, or you might also store it in any location and copy the path of that particular directory; both will do. I am skipping these parts and leaving this dataset loading section to you, as it is pretty basic. You can download any dataset of your choice. Remember one thing, the larger the dataset, the better trained the model will be, but it comes with the cost of the model taking more tie to get trained.
The dataset that I will be using, you can download it from here: link
On downloading the dataset, you will see that it contains two python scripts bw2color_image, and bw2color_video. In this article, we shall be only dealing with the image part.
Adding Colors to a Grayscale Image:
Let us now work on adding color to the grayscale image.
We will be adding our codebase to the bw2color_image.py file.
Importing the necessary dependencies :
import numpy as np
import argparse
import cv2
ap = argparse.ArgumentParser()
ap.add_argument("-i", "--image", type=str, required=True,
    help="path to input black and white image")
ap.add_argument("-p", "--prototxt", type=str, required=True,
    help="path to Caffe prototxt file")
ap.add_argument("-m", "--model", type=str, required=True,
    help="path to Caffe pre-trained model")
ap.add_argument("-c", "--points", type=str, required=True,
    help="path to cluster center points")
args = vars(ap.parse_args()
Now let us add the CLI arguments so that if we want to test our model in the future for different custom inputs, we can do so easily.
Loading the model and cluster:
print("Loading the model...")
net = cv2.dnn.readNetFromCaffe(args["prototxt"], args["model"])
pts = np.load(args["points"])
class8 = net.getLayerId("class8_ab")
conv8 = net.getLayerId("conv8_313_rh")
pts = pts.transpose().reshape(2, 313, 1, 1)
net.getLayer(class8).blobs = [pts.astype("float32")]
net.getLayer(conv8).blobs = [np.full([1, 313], 2.606, dtype="float32")]
The "cv2.dnn.readNetFromCaffe()" function directly reads the values from the CLI into the Caffe Model, We then load the centers for the ab channel.
Loading and Converting the Image (PreProcessing)
image = cv2.imread(args["image"])
scaled = image.astype("float32") / 255.0
lab = cv2.cvtColor(scaled, cv2.COLOR_BGR2LAB)
We scale the pixel intensities from 0 to 1 and also convert BGR to Lab Space
We are now going to resize the image to 224 x 224, which are the required inputs for the dimensions of the network. We also handle every single point as a 1×1 convolution to add further to our model.
resized = cv2.resize(lab, (224, 224))
L = cv2.split(resized)[0]
L -= 50
What we do here is, take the L channel and perform the “Mean Subtraction” on it.
Now we can pass the ‘L’ as input and predict the ‘ab’ channels.
'print("Colorizing the image...")'
net.set input(cv2.dnn.blobFromImage(L))
ab = net.forward()[0, :, :, :].transpose((1, 2, 0))
ab = cv2.resize(ab, (image.shape[1], image.shape[0])
Some Post-Processing:
L = cv2.split(lab)[0]
colorized = np.concatenate((L[:, :, np.newaxis], ab), axis=2)
colorized = cv2.cvtColor(colorized, cv2.COLOR_LAB2BGR)
colorized = np.clip(colorized, 0, 1)
# the current colorized image is represented as a floating point
# data type in the range [0, 1] -- let's convert to an unsigned
# 8-bit integer representation in the range [0, 255]
colorized = (255 * colorized).astype("uint8")
# show the original and output colorized images
cv2.imshow("Original", image)
cv2.imshow("Colorized", colorized)
cv2.waitKey(0)
What we did above was, chop off any pixel values that might have lain outside the range 0 to 1. We have also brought back the intensity range from 0 to 255.
Evaluating our model
In the terminal now, you can try running the script that we have just written "bw2color-image.py".
You can use the command below :
python bw2color_image.py
    --prototxt model/colorization_deploy_v2.prototxt
    --model model/colorization_release_v2.caffemodel
    --points model/pts_in_hull.npy
    --image images/robin_williams.jpg
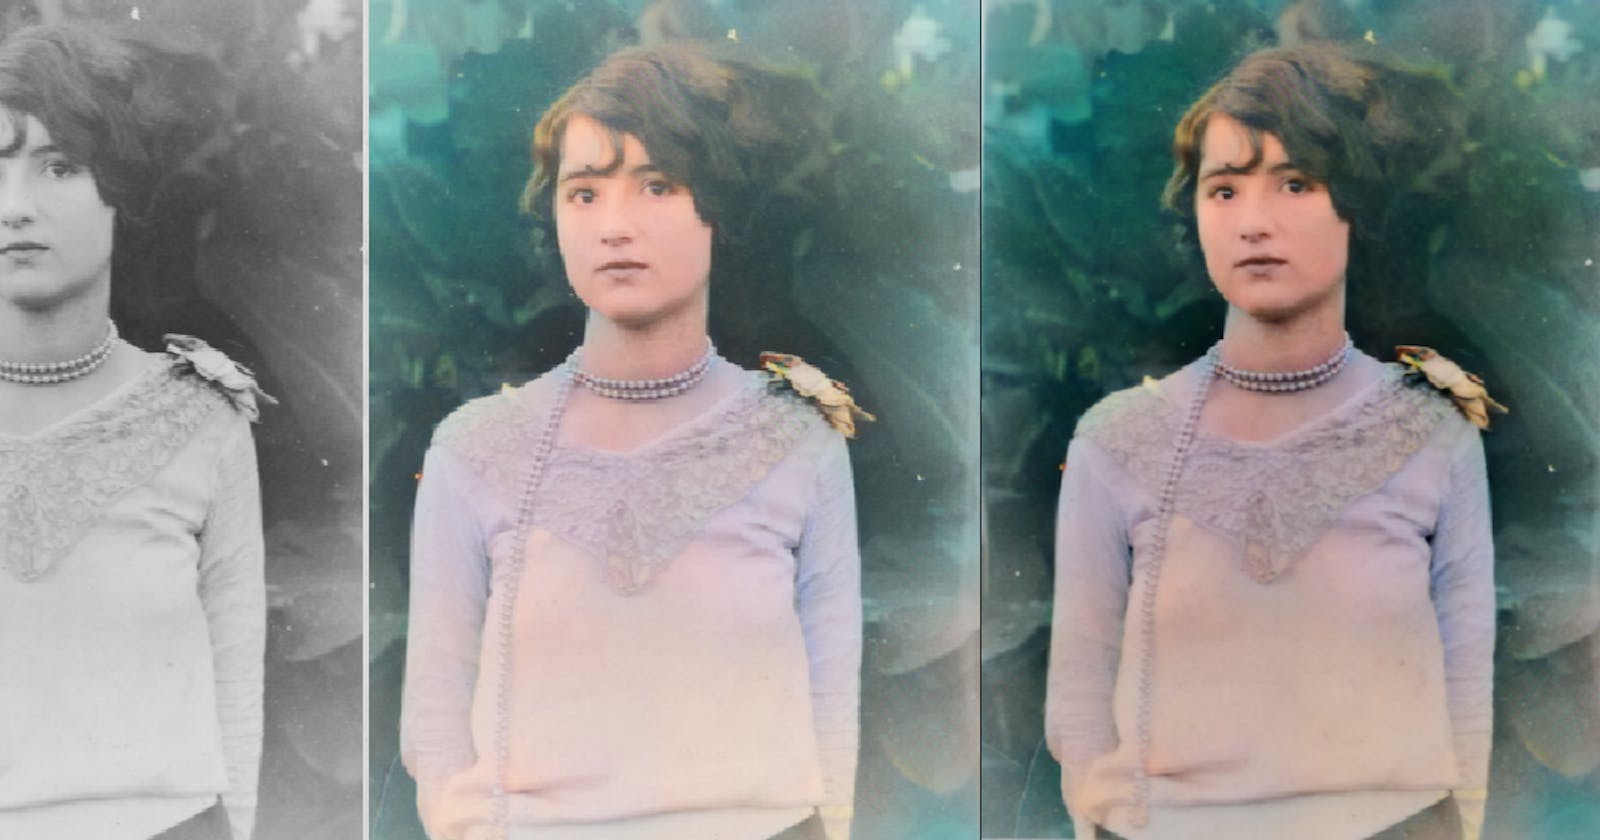
The results given are :

Likewise, we can perform the same for various grayscale images by merely adjusting and customizing the paths in the CLI.
You can observe that there exist some gray areas in the developed image as well. But the model performs well enough to demonstrate the functioning of the project.
Conclusion
In this article, we saw how the colorization of images can be done using some concepts of OpenCV and Deep Learning. Using this particular model, we could colorize the input of grayscale images to colored images to a large extent.
We can also implement the concept of colorization of images into a project of colorizing videos. All we have to do is use VideoStream to read the frames of the video, and time, to pause the code base from running for a while when the camera module boots up.
The model can be improved, by using a larger dataset, to train it, but it will come at a cost, i.e., the model will take more time to get trained.
But be careful about the dataset you use. If you consider using a dataset with varied data, the model might be overfitting, ultimately giving incorrect results.
So this is all for now, from my side! Thanks a lot for reading.
If you face any issues or come across a doubt, feel free to send me a message on my social handle Linked-in.
You can also follow me on Twitter.